Overview
Buy from
Noble Knight Games
I recently spent some time playing “Leningrad ’41: The Northern Struggle”, designed by Emanuele Santandrea and recently released
by VentoNuovo Games. Following the pattern of most of VentoNuovo’s games, it is a World War II block game. This particular title
covers the German invasion, along with their allies the Finns, of the Soviet Union and their push to occupy the northern Russian
city of Leningrad.
There are 4 different scenarios:
- Les Preludes - Covers the first month (July) of the battle only.
- Leningrad in Sight - The first two months of the battle only.
- Closing the Ring - Covers the key months of September and October 1941.
- The Road to Leningrad (Campaign Game) - The entire campaign from July to the end of December 1941.
One "month", in game-play terms, consists of the German player executing an "Impulse" (which is basically a "turn"), followed
by a Russian Impulse. Then, both players keep alternating Impulses until their units or HQs become exhausted and must pause
for Reinforcement and/or Regeneration. So a "month" can take anywhere from 30 minutes to an hour. This means that whether
you have only 1 hour or 6 hours to spare for gaming, Leningrad '41 has a scenario for you.
I had originally intended to write a full review of the game, but I have a personal preference for strategy articles, either
general strategy or tactical tips that focus on one specific facet of a game. As it turns out, Leningrad '41 presents players
with a surprising number of operational/tactical decisions, any one of which can be the key to victory.
You must know when it's time to "Blitz", when to give up the "Initiative" in order to perform "Exploitation Movement",
when to opt for a "Strategic Impulse"; and whether to use the Strategic Impulse to Reinforce or to press a battlefield advantage.
Should you declare a "Logistics Pause" or risk exhausting your troops for one more push? (more about these options later).
As the Axis player, you have the additional considerations of how to manage the Finns; should you expend the logistical capital
necessary to allow them to create a credibly threatening second front? How about diverting some supplies and ammo to Dietl to put some starch
in his drive along the "Trail to Murmansk"? That can quickly result in Axis acquisition of a precious Victory Point...
or it can be a total waste of time, all depending on the vagaries of the dice.
It's going to take quite a few more plays of Leningrad '41 before I really have a handle on the "cause and effect" matrix
of the various options. But one must start somewhere, proposing a hypothesis then testing it. So, after a few play throughs, I
found one aspect of Campaign Game play that struck me as critically important: Germany's opening move. This article will suggest
an opening Impulse for the Axis player that I believe puts him on a trajectory to victory. "Well begun is half done", as the proverb claims.
Well Begun is Half Done!
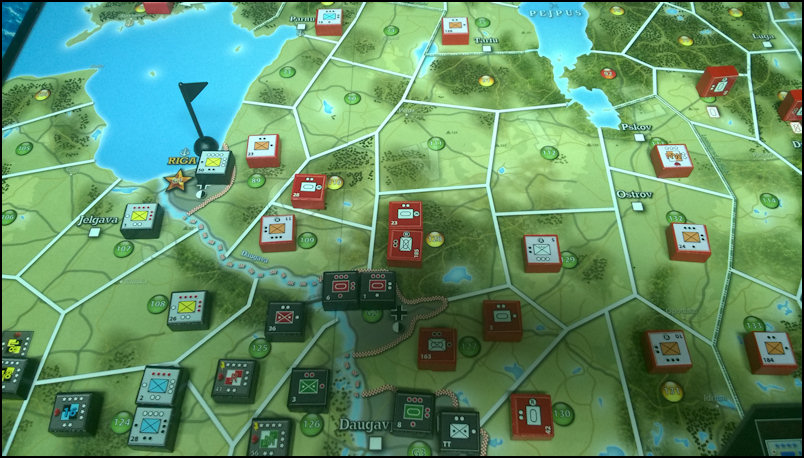
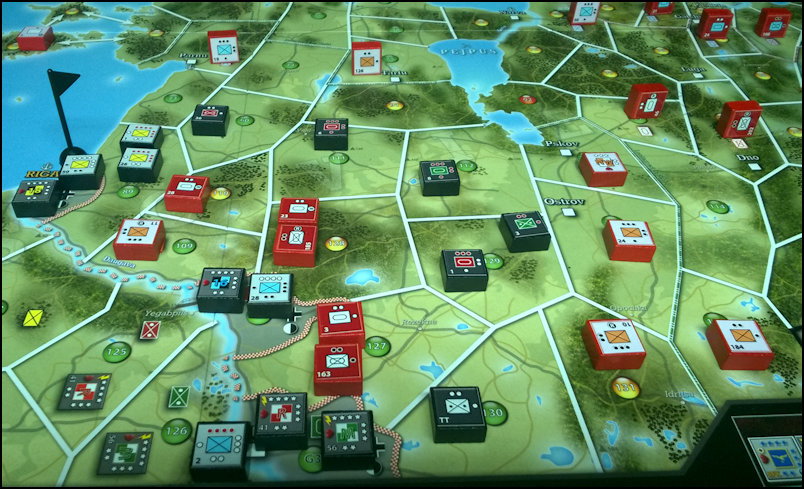
Leningrad '41 - Starting Positions
The main German force begins the Campaign game (and the "Les Preludes" scenario) in Latvia in a rough line from
Riga (Area G1) in the north to Daugavpils (Area G3) in the south, poised to invade Estonia to the north and Russia proper to the east.
First thing when planning any battle is to assess what God gave you to work with, i.e. the terrain. You'll find that
much of the terrain in Latvia and Estonia is open terrain (indicated by a green terrain circle), as is a part of
western Russia, but only as far east as Pskov (Area 113) and south from there to Velikiye Luki (Area G4).
Further east into Russia... not so much. You won't see much but Yellow and Red areas there, which slow down movement
and augment defender strength.
Leningrad '41 uses the concept of defensive "Absorb Bonuses" that provide defending units the ability to
(you guessed it) "absorb" hits without being damaged. Green areas have *no* Absorb Bonus at all, making them prime targets
for an attacker. In addition, Green areas facilitate aggressive maneuvering during the "Blitz" segment which occurs after
standard combat. Any "Fast" combat block (i.e. an armor or mech unit or HQ with enhanced movement allowance) that
wins a battle in a Green area by clearing out all defending enemy units, may move again during the "Blitz" segment into
another adjacent Green area and possibly attack more enemy units there. The German forces *must* capitalize on this
Blitzing capability in order to move deep into Russia quickly before Russian reinforcements start arriving in large numbers.
And before the dreaded Russian Winter sets in.
Let's go over the specific German moves for Game Turn #1, first Impulse.
Rivers have no effect on movement, but units that cross rivers to enter a new combat situation are marked with a blue "River Attack
Cube" and suffer reduced combat strength.
Two powerful groups of German units move toward the east and west flanks of the battle area. I won't go into an area-by-area
description of the movement, but interested players can double-check me on this. Basically, "fast" blocks (e.g. those with dark red
or black backgrounds) may expend up to 5 movement points. And green areas cost 1 movement point each. So the movements described here
ensure that:
- Sufficient "Fast" combat blocks are in place to provide the punch necessary for a "Blitz" after the initial combat.
- Blitzing-capable HQs (Manstein and Reinhardt) are within range of the areas where the initial battles are
going to take place. Blitzing-capable HQs are marked with a lightning bolt.
- The HQs (except for the 16th) are positioned adjacent to the upcoming battle areas, allowing for artillery support.
- There is sufficient strength left behind to guard the HQs while their units Blitz.
Each combat HQ has an associated artillery marker which has the same letter as the owning HQ. Ex: the Manstein HQ artillery
marker as an "M" on it; the Reinhardt artillery marker has an "R",
etc.). During movement, players may place the HQ artillery marker on any area adjacent to the HQ where combat is going to occur.
As you can see, after movement is complete and artillery assigned (see the adjunct "M", "R" and "18" artillery markers), the
Germans are in a position of overwhelming superiority. It's possible that the Germans could have *terrible* luck with the dice,
but odds are heavily in their favor. I fully expect Areas 130 (eastern flank) and 89 (western flank, next to Riga)
to be cleared of Russian units after combat.
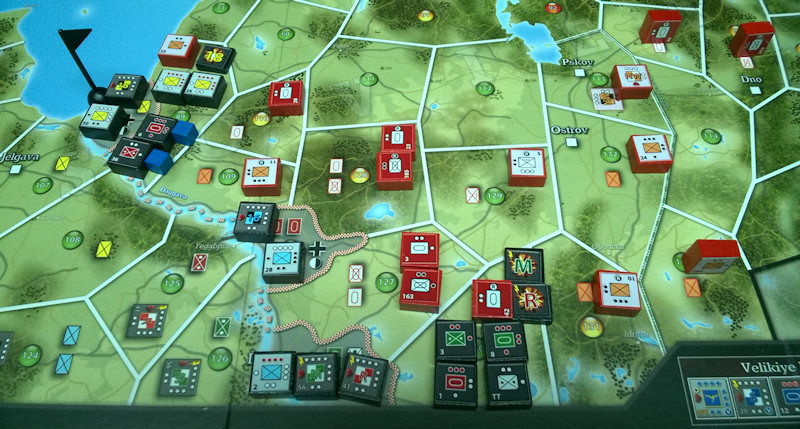
Leningrad '41 - After German Movement
A unit's combat strength is determine by the number of pips/bullets on the top edge of the block, which determines how many D6
he may roll, and the color of the pips/bullets. Red pips, the most powerful, score a hit on a D6 roll of 4, 5 or 6. White pips score
hits of a roll of 5 or 6 and Black pips hit only a rolls of 6. So you can see the disparity in strength between the German and
Russian units.
Surprise, surprise! After combat is complete, Areas 130 and 89 *are* cleared of Russian units. Not surprising because of the
general superiority of the German units, combined with the preparatory artillery barrages, and the lack of quality defensive
terrain. To add insult to injury, the "Tank Attack" rule just about makes it impossible for the Russians to even inflict
some reciprocal damage before being destroyed.
Normally, combat consists of offensive artillery fire, followed by air defense and air attacks, then ground combat begins
with the defender firing first. However, the "Tank Attack" rule allows the attacker for fire first in this case because
1) the weather is Good, the battle is taking place in a Green area, and the attacker has at least one tank and the defender
has none.
Now we're getting to the good part, the "Blitz Segment". Any "Fast" combat block that participated in a battle in a Green area,
cleared that area of enemy units, and is in range of Blitzing-capable HQ, may expend 1 additional movement point to move into
an adjacent Green area that is not contested (i.e. either solely enemy occupied, or unoccupied; in other words you can't Blitz
into the middle of an on-going battle).
So I have 3 of my "fast" movers advance from area 130 to 129 in the east, and 2 "fast" units blitz from area 89 to 90 in the west.
Area 90 is unoccupied so no battle takes place there, but the 3 units in area 129 must battle with the single step Russian
airborne unit there. All that is required is a single hit out of 8 dice, each with a 50% chance of scoring a hit. I'll leave
it to the quants to calculate the actual odds of doing this, but for purposes of this article I'm going to call this a "gimme".
Great. We've just about encircled the remaining 6 Russian units... but not quite. This is frustrating because my objective
has been to destroy *all* Russian units in Latvia while taking minimal (or no) casaulties. If I can "Isolate" them, they
will be unable to move, attack, reinforce, etc. and will suffer step losses each Russian impulse until they are gone for good.
Which leads me to the usage of the "Initiative Disc".
At the start of the game, the Axis player is in possession of the "Initiative Disc". He may hold on to it for as long
as he wishes or he may "spend" it. If he spends it, it is turned over to the Russian player who will then hold the Initiative.
Spending the Initiative allows the player to: 1) play a "Strategic Impulse" or 2) perform "Exploitation
Movement", which is what we're concerned with in this article.
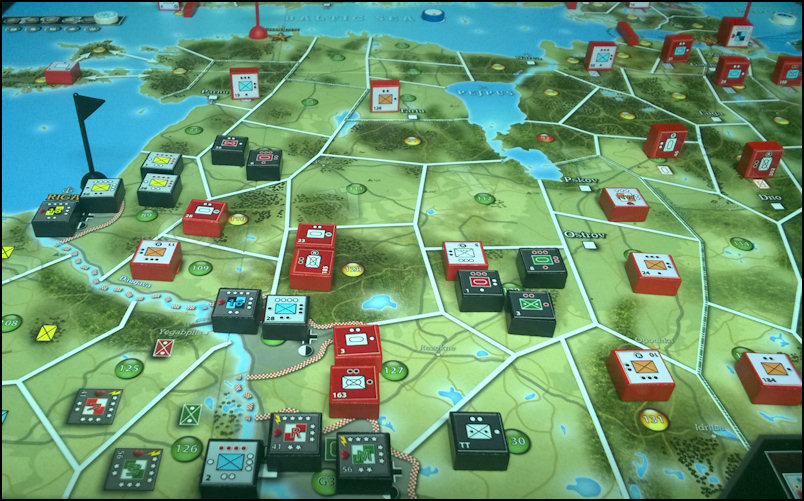
Leningrad '41 - After German Combat and Blitz Movement
During the Exploitation Move, the active player may move a number of "fast" blocks (HQ included) up to their maximum Movement
Allowance. They must be in supply and they may not engage in combat or disengage from combat.
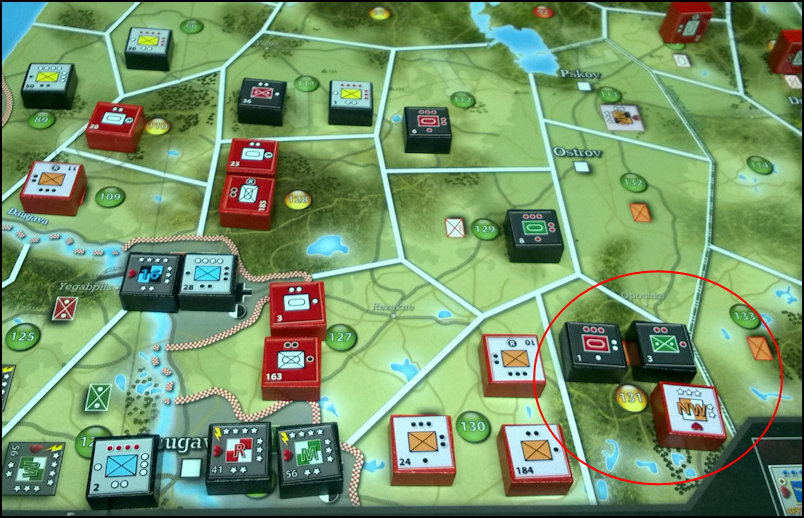
In order to "close the ring", I chose to spend my Initiative Disc so that just two units, one from the eastern pincer
and one from the western, could complete the encirclement, moving into Areas 112 and 111, respectively.
Leningrad '41 - After German Blitz Combat, Initiative Disk Usage, and Exploitation Move
Russian Options
It might be that my surrender of the Initiative just to move two units was a gift to the Russians, who now hold the Initiative.
Let's consider Russian options for their upcoming Impulse.
1.
They can perform a standard tactical turn and attempt to relieve their isolated units in Latvia. The best option they have
to accomplish this is to attack the single mobile unit ("TT") in Area 130. There are only 3 combat units, and one HQ, in range of Area 130
because infantry units only have 3 movement points and "Yellow" Areas cost 2 movement points to enter. This battle has a fair
chance of success, but would leave the area from Pskov south to Velikiye Luki very weak.
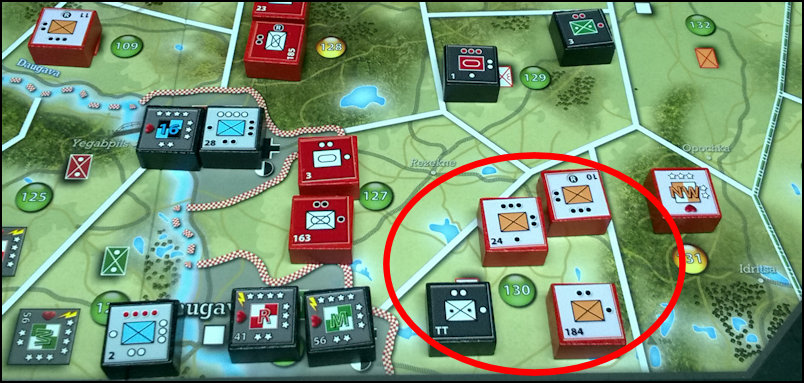
Leningrad '41 - Possible Russian Counterattack
Remember that units which begin the Impulse out of supply are unable to move or attack for the duration of that Impulse, even
if their supply line is opened during the course of the Impulse. So an aggressive attempt to relieve the Isolated Russian units
may result in a German counter-counter-attack... and ultimately end up with more Russian units trapped and isolated.
Leningrad '41 - Possible German Counter-Counterattack!
2.
Another Russian option would be to just let the isolated units wither, and spend the newly acquired Initiative Disc to
peform a "Strategic Impulse" (Reinforcement Option). During this type of Strategic Impulse, no Russian units on the map
would be able to move or attack, but a considerable number of reinforcement units could be brought on the map, ready for use
in upcoming Impulses.
Closing Thoughts
From the German perspective, either of the Russian options works out to their short term advantage. Every Russian unit eliminated
in combat can ultimately be brought back on map as a Reinforcement. But units that are eliminated due to Isolation are gone for good!
So if the Russian opts to spend the Initiative Disc and bring on Reinforcements, the number of their units eliminated in combat and due
to isolation thus far may end up equalling the number of units brought on as Reinforcements. This will also give the Germans another
Impulse to consolidate their hold on Latvia and expand into Estonia and Russia proper.
But, on the other hand, if the Russians perform a standard Tactical turn and attempt to relieve their isolated units, then
may end up in deeper water than they already are (as mentioned above). German units are also in north Latvia in sufficient force
to clear Estonia of Russian troops, and secure Tallinn, the Victory Area located there.
Finally, if nothing else, the German units on the map can always pivot south and just crush all the Russian units in Latvia.
That's not as satisfying as eliminating them due to Isolation, and defeats the purpose of what I'm trying to accomplish, but it
does result in about 15 Russian units eliminated by the end of July 1941. And that's just in the German sector. The Finns can
be put to good use in the north as well.
This "Perfect Opening" will be put to the test in my next few games of Leningrad '41 and, I'm sure, it will go the way
of all "perfect" plans once contact with the enemy is made. But I'm having a lot of fun with the game in the meantime, exploring
all the interesting options. I'm sure I'll have another Perfect Opening by next month...
Feel free to email me (see below) or share an article of your own.